Our Process
We are a true mom and pop business. Throughout this site, when I say "I", I mean me (Scott Cortelyou) When I say "we", I am including Jami "the woman's touch" Cortelyou, my wife. Jami's influence is one of the things that separates us from many "sole" proprietor leather makers. Jami is responsible for much of the creative side of our process. She tools and carves all the flower designs as well as all the leather hair accessories. She also does all the hand painting as well as the bulk of the block dying. I am responsible for the majority of the "grunt" work. I cut or "click" as well as "slick" most items. I do most of the repetitive geometric tooling. I also punch all the holes as well as set the hardware. All items are proudly handmade in our 400 square foot backyard workshop.
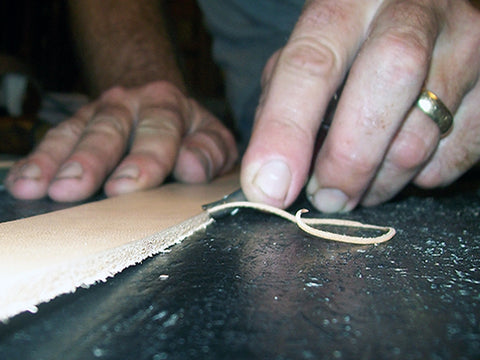
We begin all of our projects with full grain, vegetable tanned cow hides.

The picture above shows what the natural leather looks like as well as the simple hand tool we use to cut our "strap leather goods" such as belts, watch bands, bracelets, etc. Basically anything that is cut to a consistent width. The Strap Cutter is one of the very first tools we bought over 25years ago. A heavier, updated metal version is available, but I prefer the feel of the wood and I am proud of the patina that our dirty, leatherworker hands has produced over the years. Not to be a bummer, but we lost my dad to cancer in 1998. I have his wooden strap cutter waiting to be put back into use if the sad day comes when this one can no longer perform its job.

I have no idea how many straps we have cut over the years, but it is kind of cool to think about.
Before finishing, we bevel (round) and burnish (smooth) the leather edges. We have a fancy Bluegrass Edger that bevels all four edges at once. This bench mounted "machine" is a huge time saver and can be found at Weaver Leather However, it is not at all uncommon for us to do it the old-fashioned way as well... especially on thinner leathers that you need to "feel" as you alter its structure.

We also burnish (smooth) the leather edges. We do this step at various stages in the process depending on the item. We use a homemade "Slicker Wheel" We have two slicker wheels in our shop. One is countersunk and the other is bench top mounted. Basically, the wheel is a hand turned piece of hardwood. One of our wheels is Oak and the other is Poplar. The motors are old appliance motors with an Arbor available at Sears attached to the shaft. The threaded arbor adapter allows us to attach our wheels as well as sanding drums, polishing wheels, etc. I believe the inspiration for the wheel came from the 1972 book "Brendan's Leather Book" If not, the book is still a fantastic source for a novice, primitive style leather worker. My parent's gave it to me because they found it so useful when they founded their small business in the early 1970s. I'm sure you can find this book on that website I refuse to mention because they are small business killers! Support your local, independently owned bookstore!

The picture above shows our countersunk "slicker" The wheel on the left is bolted to the bench and acts as a "fence" to apply a slight amount of pressure. The wheel on the right is attached to the motor. The fast spinning wheel burnishes the leather edge as we slowly pull it through the wheels. The "slicker wheel" is our only piece of machinery that requires electricity.
The picture below show our bench top mounted slicker wheel that we use to burnish the edges on curved and rounded items as well as smaller pieces.

We "block dye" most of our items. This means we literally use a wooden block to dye the leather. Our blocks are made from 2 x 4 wood scraps. One surface of the block is wrapped with several layers of cloth. Because the cloth wears out, the Dying Blocks are always changing. "Block Dying" allows us to change the color of the leather. However, because the block only rubs the surface of the leather, the tooled impressions remain the natural color. This is how we create the contrast in colors you see in many of our handmade leather goods. It takes a great deal of experimentation to find the ideal material and material thickness. Jami does most of the dying because I am impatient and often apply too much dye, too fast and then I get in trouble with the boss. Below is a picture of our dying blocks. You need a separate block for every color. It looks like the block we use to dye Mahogany just got a fashionable makeover with some Hello Kitty material!

Finally, we have made it to a point on the page where you get to see some finished leather. The pictures above are a clear indicator of how "messy" the process is to complete. Yet somehow the many steps eventually lead to some pretty cool stuff that we take great pride in producing. The pictures below show our hand dyed colors and how they appear in different settings. All of our items are dyed using Fiebing's Professional Oil Dyes.

Believe it or not, the picture above and the picture below are of the exact same straps. The hand dye colors from left to right are Saddle Tan, Mahogany, Dark Brown, and Black. These pictures show how the colors require light to reflect the true colors. We have had customers call and say, "I ordered brown, but you sent me black" We always say, "Have you looked at it in the sunshine?" Go outside and play if you want the maximum effect of your leather goods.


These photographs are actually a little deceiving but serve to make a point. The brighter picture above was taken inside using flash photography. The photo below was taken outside in shaded area. In reality, the leather colors show best under sunlight. The flash causes the colors to reflect well for a camera. The colors fro.m left to right are Saddle Tan, Mahogany, Brown Natural, Brown Antique, Black. Under dim lighting, it can be difficult to distinguish between our Mahogany and Dark Brown. However, under natural sunlight, the Mahogany clearly reflects a hint of red. Sometimes, when I am shipping our plain butterfly barrettes, I have to stand under the skylight to ensure I have the correct color. The difference between "Natural Brown" and "Antique Brown" is an extra step. Anything and Everything on this site that is described as "antique" in the dye description has been highlighted using Tandy Eco-Flo Gel Antique. The strap cutter you see at the top of this page was bought at retail pricing at a Tandy Leather in Tucson, AZ in 1996. Tandy/The Leather Factory are still around, but we are far less dependent on their services. We do like their Antique finish and we also buy our very thin 2/3 ounce and 3/4 ounce leather at the Tandy Leather in Tampa. Because we do not have a reliable source for these weights, we like to hand select the hides. Load up... we are going to town!


Wow! you made it all the way to the bottom of a pretty long page. We hope you enjoyed the journey. The pictures above and below demonstrate our signature 2 Tone hand dyed colors. Every item we offer in 2 Tone employs the Antique finish mentioned above. The colors from left to right are Brown/Tan, Black/Tan, Black/Mahogany, Black/Brown. While I am a plain, one color guy; I am a little envious of the people that can rock our 2 Tone styles. Questions, Comments or Smart Remarks? Email Us.
